Clinical procedure
![](https://elsodent.com/wp-content/uploads/2023/05/SEAL-TEMP-1-Temporary-bridge-trimmed-and-polished-try-in-150x150-1.jpg)
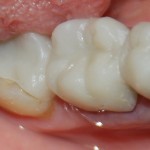
1- Temporary bridge, trimmed and polished – try in
![](https://elsodent.com/wp-content/uploads/2023/05/SEAL-TEMP-2-Injection-of-the-cement-in-the-temporary-bridge-150x150-1.jpg)
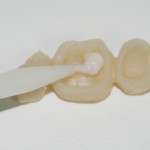
2-Injection of the cement in the temporary bridge
![](https://elsodent.com/wp-content/uploads/2023/05/SEAL-TEMP-3-Cementation-of-the-temporary-bridge.-150x150-1.jpg)
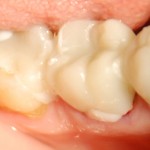
3-Cementation of the temporary bridge.
![](https://elsodent.com/wp-content/uploads/2023/05/SEAL-TEMP-4-Temporary-bridge-trimmed-cemented-occlusion-checked.-150x150-1.jpg)
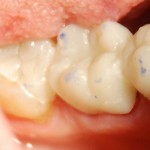
4-Temporary bridge trimmed, cemented, occlusion checked.
Dual syringe form
- Before first use, take the cap off and check that the two exits are unblocked.
- xtrude a little bit of cement to be sure that the 2 parts equally flow. Put a mixing tip on.
- Extrude the desired quantities and apply a thin layer in the intrados of the temporary crown.
- The crown or bridge should be firmly hold in place, by asking the patient to bite.
- Eliminate the excess immediately by spreading them on the temporary crown, with a mouth spatula, to obtain a smooth joint. The cement is totally hard after 1minute
Check the occlusion with an articulating paper. - Leave the mixing tip in place until the next use.
2 syringes: 12,5 g
- Take the caps off and extrude the desired equal quantities of base and catalyst, from the 2 syringes onto a mixing pad. Put the caps back in place.
- Mix the 2 pastes with a mouth spatula (10 s.) and apply a thin layer of cement in the intrados of the temporary crown.
- The crown or bridge should be firmly hold in place, by asking the patient to bite.
- Eliminate the excess immediately by spreading them on the temporary crown, with a mouth spatula, to obtain a smooth joint. The cement is totally hard after 1 minute
- Check the occlusion with an articulating paper.